HIGH SPEED PLANER TRAINING
Loading Laminates

Course Menu
- Back to Main Menu
- Lesson 1 – Introduction
- Lesson 2 – Safety Procedures
- Lesson 3 – Pre-Operational Checks
- Lesson 4 – Operating Instructions
- Lesson 5 – Glue Test
- Lesson 6 – Size Change
- Lesson 7 – Troubleshooting
- Lesson 8 – When Down,Do
- Lesson 9 – End of Shift Procedures
- Lesson 10 – Competency Quiz
- Lesson 11 – Trainer Verification
Introduction
The rotary press is a critical component of our production process, designed to press and bond timber laminates using a high-pressure system. This module will provide an overview of the key components involved in the operation of the rotary press, focusing on the glue system, safety features, and the steps involved in producing high-quality laminated beams. By understanding these components, you will be better equipped to operate the machine safely and efficiently.
HSP HMI Overview
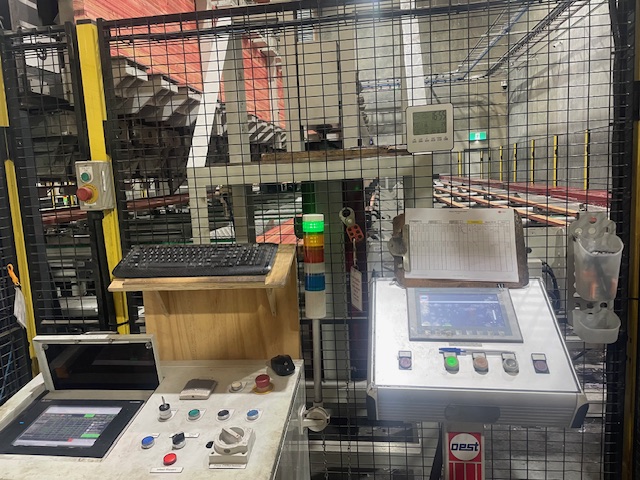
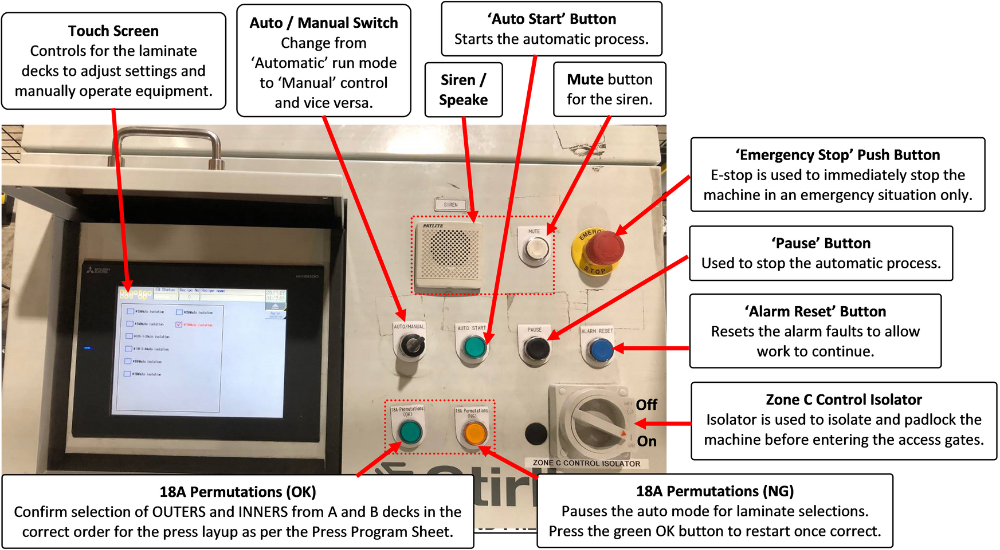
The HMI control panel is the user interface for the rotary press. Operators use this panel to manage all aspects of the press operation (excluding glue settings). It also displays data on the current press, error codes and provides access to the manual mode for troubleshooting. The HMI is the central hub for monitoring the press and making adjustments in real-time to ensure efficient operation.

Press Program Sheet Overview
Operating the HSP involves tracking important production data using the Press Program Sheet. These documents ensure the correct setup, monitoring, and documentation of press runs.
The Press Program Sheet provides all information for the days production run.
- Product – Shows the Grade, Size, & Treatment.
- Job ID # – Shows the Job ID for the Current Press. Must Match the code on Sterling System
- Recipe – Shows the beam recipe and total number of laminates in each Beam
Planer Setup
Before starting production, it’s essential to set up the High Speed Planer correctly. This involves preparing the planer heads, feed rollers, and control systems to ensure that the machine is ready for operation.
Greasing the Planer Heads:
Step 1: Pump up the planer heads with grease to 350 bar. This is crucial for maintaining smooth operation and preventing wear on the cutting surfaces.
Step 2: Grease the bearing plate to 300 bar to ensure that the planer operates smoothly and without unnecessary friction.
Inspecting and Setting the Knives:
Step 1: Inspect the planer knives for any signs of damage or wear. Sharp, undamaged knives are critical for producing a clean and accurate cut.
Step 2: Ensure that the knives are correctly aligned and secure in their mounts. Any misalignment can result in poor surface finish and uneven laminate thickness.
Feed Roller Setup
Adjusting the Feed Rollers:
Step 1: Ensure that the feed rollers are clean and free of debris. Any build-up on the rollers can cause feeding issues or damage to the laminates.
Step 2: Adjust the rollers to the appropriate height and pressure based on the thickness of the laminates being processed. The rollers must grip the laminates firmly without causing indentation or damage.
Checking Roller Alignment:
Step 1: Verify that all feed rollers are aligned correctly to guide the laminates smoothly through the planer. Misaligned rollers can cause jams or uneven feeding.
Running a Test Piece:
Step 1: Start the planer, one cutter at a time, and run a test piece of timber through the machine. This allows you to check the finished size and surface quality of the laminate.
Step 2: Measure the finished size for both width and thickness. Ensure that the laminate meets the required specifications before proceeding with full production.
Step 3: Re-calibrate the size on the control panel if necessary, based on the measurements from the test piece.
Once the planer is set up and ready, the next step is to operate it efficiently to produce laminates that meet the required specifications. This involves carefully loading the laminates, monitoring the process, and making adjustments as needed.
Preparation/Loading the Laminates
Timber Feeding and Planing Process
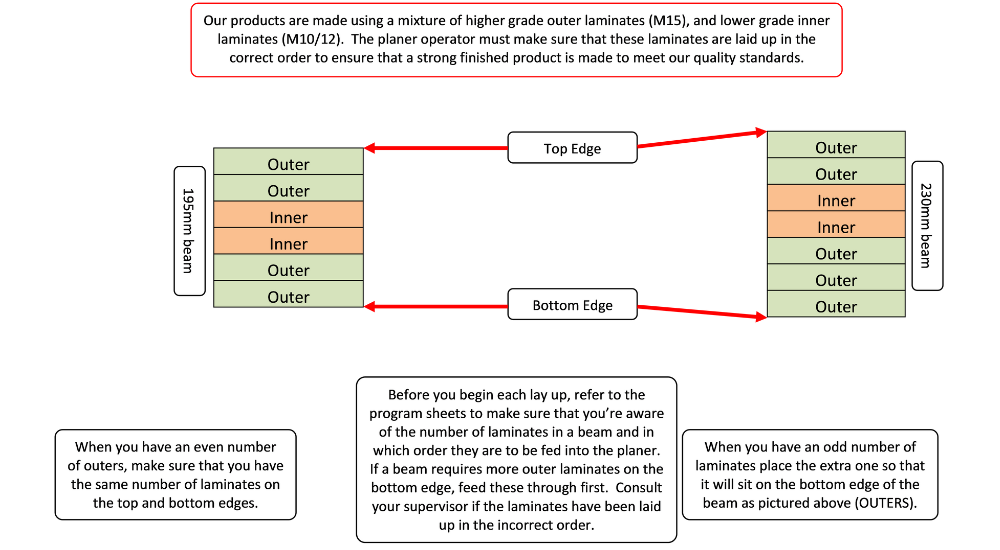
Laminates (lams) must be loaded and prepared across multiple decks before they are fed into the High-Speed Planer (HSP) for dressing and then onto the rotary p press. The laminates, which include both inner and outer layers, are loaded onto designated decks based on the job specifications provided by the Stirling system. These laminates are then transferred through a series of conveyor chains, ensuring they are correctly aligned and sequenced for the planing process. Once loaded onto the 18A and 19A chains, the lams are guided into the planer, where they are dressed to the exact dimensions required for gluing and pressing into finished beams. This guide details the critical steps involved in loading, transferring, and monitoring laminates, ensuring smooth and efficient operation throughout the process.

Confirm Laminate Quality
Check the Stirling system and the job sheet to verify the required length and number of laminates needed for the upcoming press. Ensure all laminates meet the specifications of the current job.

Load Laminates onto the Deck
Follow the steps below to load laminates according to the recipe provided by the Stirling system:
- Ensure the lifter is positioned at the correct deck (Deck A for outers, Deck B for inners).
- If the lifter is not aligned correctly, adjust its position by using the lifter controls to move it up or down to the required deck.
- Lower the stopper on the corresponding deck (17A1 for Deck A or 17A2 for Deck B).
- Manually move the chain forward until the required number of laminates has moved past the stopper.
- Raise the stopper on the 17A1/17A2 deck to hold the laminates in place.
- Move the laminates forward onto the 18A chain using the manual control.
- Once the laminates are positioned on the 18A chain, use the 18A manual control to move them up onto the deck.
- Repeat this process until the correct number of laminates has been loaded onto the 18A deck.

Move Laminates from 18A Deck to 19A Chains
After confirming that the correct number of laminates are on the 18A deck:
- Ensure the 19A chains are operational by holding the pause button until the chains begin running.
- Lower the stopper on the 18A chain deck.
- Manually move the 18A chains forward until all laminates are transferred onto the 19A chains.
- Once the laminates have moved to the end of the 19A chains, press pause to stop the chain movement.
- Raise the 18A deck stopper to hold back additional laminates.

Send Recipe Data to the Press HMI
Data for each press must be sent to the Press HMI before processing:
- To send the layup for the next side of the press, select ‘CLEAN SWITCH’ on the Stirling system, then switch to the next job in the list. The jobs will be listed from 1-5 on the Stirling system.
- Confirm the Job ID on the job sheet and match it with the correct job in the list.
- Once the correct job has been selected on the HSP HMI, the job details will be displayed on the screen. Verify that the information is accurate.
- Confirm that the number of beams matches the job sheet and set the current quantity to 1. Then press ‘infeed ready’. Once the data has been successfully sent to the press, the system will highlight it in grey.

Start the Planing Process
Once the recipe (layup) is prepared on the 18A chain deck, and after the press operator signals readiness:
- Hold the pause button to initiate the movement of the 19A chains.
- The laminates will move from the 19A chains onto the planer infeed and through the planer.

Record Press Information
After starting the press:
- Record the date, time, and your initials on the press control sheet.
- Highlight this information to indicate that the press has started.

Prepare for the Next Press
Once the planing process is underway, begin preparing for the next press cycle by:
- Loading the next set of laminates onto the 18A deck following the same process as outlined above.
Monitoring the Process
Monitoring Feed Consistency:
Step 1: Monitor the feed rollers as they guide the laminates into the planer. Ensure that the rollers maintain a firm grip on the laminates without causing slippage or misalignment.
Step 2: Adjust the feed speed using the Feed Speed Dial on the control panel if necessary. The speed should be set based on the type of laminate and the desired surface finish.
4.2.2 Monitoring the Process
Process Monitoring:
Step 1: Continuously monitor the planer’s operation by observing the laminates as they pass through the machine. Look for signs of improper cutting, such as rough surfaces, uneven thickness, or any visible defects.
Step 2: Listen for unusual noises that may indicate issues with the knives, rollers, or other components. Any unusual sounds should be investigated immediately to prevent potential damage to the machine or the laminates.
Adjusting Planer Settings:
Step 1: If you notice any inconsistencies in the laminate finish, pause the operation and make necessary adjustments to the cutter heads, feed rollers, or other settings. This may include adjusting the pressure of the rollers or re-aligning the cutters.
Step 2: Use the touchscreen control panel to make fine adjustments to the planer settings. Ensure that these adjustments are based on observed issues and are aimed at improving the laminate quality.
4.2.3 Addressing Common Issues
Dealing with Planer Jams:
Step 1: If a jam occurs, immediately stop the planer using the Emergency Stop (E-STOP) button. Never attempt to clear a jam while the machine is running.
Step 2: Carefully clear the jam by removing any obstructing laminates or debris. Check the feed rollers and infeed area for any issues that may have caused the jam, such as misalignment or foreign objects.
Managing Poor Surface Finish:
Step 1: If laminates emerge with a poor surface finish, inspect the knives and cutter heads for sharpness and alignment. Dull or misaligned knives can cause rough surfaces.
Step 2: Adjust the planer settings to increase the quality of the cut, which may involve lowering the feed speed or adjusting the pressure of the feed rollers.
Handling Inconsistent Laminate Size:
Step 1: If the laminate thickness or width is inconsistent, pause the operation and re-calibrate the planer. Run additional test pieces to ensure that the adjustments have corrected the issue.
Step 2: Document any persistent issues and report them to your supervisor or maintenance team for further investigation.

