HIGH SPEED PLANER TRAINING
Size Changes

Course Menu
- Back to Main Menu
- Lesson 1 – Introduction
- Lesson 2 – Safety Procedures
- Lesson 3 – Pre-Operational Checks
- Lesson 4 – Operating Instructions
- Lesson 5 – Glue Test
- Lesson 6 – Size Change
- Lesson 7 – Troubleshooting
- Lesson 8 – When Down,Do
- Lesson 9 – End of Shift Procedures
- Lesson 10 – Competency Quiz
- Lesson 11 – Trainer Verification
Introduction
Size change adjustments are necessary when switching from one laminate size to another. These adjustments involve modifying the width and thickness settings on the High Speed Planer, as well as ensuring that all related components are correctly configured.
Key Areas of Adjustment:
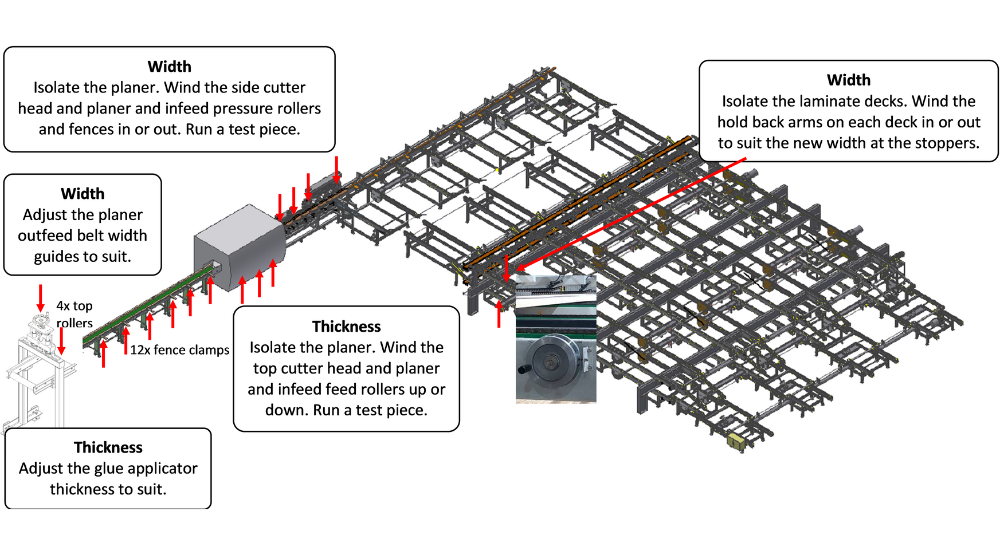
Width: Adjustments to the side cutter heads, feed rollers, and fences to match the new laminate width.
Thickness: Adjustments to the top cutter heads and feed rollers to achieve the correct laminate thickness.

Safety Precautions
Before making any size change adjustments, it is essential to follow proper safety procedures to ensure the safety of all operators and the protection of the equipment.
Full Current Isolation:
- Step 1: Isolate the planer by turning off the power at the full current isolation points. This ensures that the machine cannot be accidentally activated during adjustments.
- Step 2: Use a padlock and tag to secure the isolation point, following the procedures outlined in the MGL-190 Lockout and Isolation Procedure.
Personal Protective Equipment (PPE)
- Ensure that you are wearing all required PPE, including safety glasses, protective gloves, steel-toed boots, and an isolation tag/padlock.
Once the planer is set up and ready, the next step is to operate it efficiently to produce laminates that meet the required specifications. This involves carefully loading the laminates, monitoring the process, and making adjustments as needed.
Width Adjustments
Adjusting the width of the High Speed Planer involves several key steps to ensure that the machine can accommodate the new laminate width.
Adjusting the Side Cutter Heads
Step 1: Isolate the planer using the full current isolation procedure.
Step 2: Use the handwheel or control panel to wind the side cutter heads in or out to match the new width specification. Ensure that the cutter heads are aligned and secure.
Step 3: Run a test piece through the planer to verify that the width is correct. If necessary, make fine adjustments to the cutter head alignment.
Adjusting the Infeed Pressure Rollers and Fences
Step 1: Adjust the infeed pressure rollers by winding them in or out to accommodate the new width. The rollers should apply even pressure across the laminate to ensure smooth feeding.
Step 2: Adjust the infeed and outfeed fences to guide the laminates through the planer. The fences should be set to the exact width of the laminates to prevent skewing or misalignment.
Adjusting the Planer Outfeed Belt Width Guides
Step 1: Adjust the width guides on the outfeed belt to match the new laminate width. These guides help maintain the correct alignment of the laminates as they exit the planer.
Step 2: Run a test piece to ensure that the laminate moves smoothly through the entire system without binding or deviation.

Confirm Laminate Quality
Check the Stirling system and the job sheet to verify the required length and number of laminates needed for the upcoming press. Ensure all laminates meet the specifications of the current job.
Thickness Adjustments
Adjusting the thickness of the laminates involves modifying the height of the top cutter heads and feed rollers to achieve the desired thickness.
Adjusting the Top Cutter Heads
Step 1: Isolate the planer using the full current isolation procedure.
Step 2: Use the control panel to wind the top cutter heads up or down to achieve the desired laminate thickness. Ensure that the cutter heads are level and secure.
Step 3: Run a test piece to verify that the thickness is correct. Re-calibrate the cutter head position if necessary to achieve the precise thickness.
Adjusting the Planer Feed Rollers
Step 1: Adjust the feed rollers to the new thickness setting. The rollers should apply consistent pressure across the entire width of the laminate to prevent slipping or uneven cutting.
Step 2: Check that the rollers are clean and free of debris, as this can affect the feeding and final thickness of the laminates.
Final Verification and Test
After all size change adjustments have been made, it is important to perform a final verification and run a test piece through the entire system.
Step 1: Re-check all settings on the planer, including the cutter heads, feed rollers, fences, and width guides.
Step 2: Run a test piece through the planer to verify that both the width and thickness meet the required specifications.
Step 3: Inspect the test piece for any defects, such as uneven edges, rough surfaces, or incorrect dimensions. Make any necessary adjustments before proceeding with full production.
