FINGER JOINER TRAINING
Safety, PPE & Emergency
Introduction
Safety is the top priority when operating the Finger Jointer Workstation. The machinery involved in cutting, gluing, and joining timber can pose significant hazards if not handled properly. This module will guide you through the necessary safety protocols, equipment, and procedures to ensure a safe working environment for both you and your colleagues. By the end of this module, you will understand the importance of personal protective equipment (PPE), safe machine operation, and the isolation procedures required to prevent accidents.
Personal Protective Equipment (PPE)
Mandatory PPE: When operating the Finger Joiner, you must wear the following:

1. Hi-Vis Clothing
- High-visibility (hi-vis) clothing with reflective strips must be worn at all times to ensure operators are easily seen by others in the area, particularly around moving vehicles or equipment like overhead cranes.
- Safety Benefit: Helps prevent collisions or accidents by making sure operators are visible in low-light conditions or busy areas.

Safety Glasses
Safety glasses must be worn to protect eyes from debris, dust, or small particles that may be kicked up during operations.
- Safety Benefit: Prevents eye injuries caused by flying debris, particularly during beam cutting or handling.

Ear Protection
Approved Class 5 earplugs or Class 4 earmuffs must be used to protect hearing in high-noise environments such as when operating the saw or the finishing planer.

Gloves
Operators must wear appropriate gloves, such as riggers or leather gloves, when handling beams, dunnage, strapping, or machinery. Nitrile gloves should be used when handling chemicals like PUR glue or release agents.
It is mandatory to wear Grade 5 puncture-rated gloves when handling timber inside the orange zones of the rotary press. These gloves provide the necessary protection from sharp or splintered timber and reduce the risk of hand injuries.

Steel-Toed Safety Boots
Steel-toed boots must be worn to protect feet from heavy objects, such as falling beams or machinery parts.
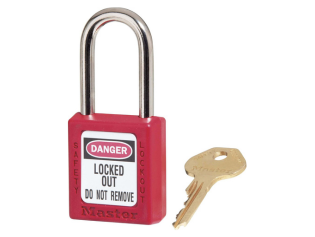
Safety Lockout Padlocks
Every operator must have an isolation tag or padlock on hand, used for isolating machines during maintenance or in case of emergencies.
E-Stops and Isolation Gates
Emergency stop (E-Stop) buttons and isolation points are critical safety features in the Outfeed section. Operators must be fully trained in how to use them in case of emergencies to stop machinery and prevent accidents.
Emergency Stops (E-Stops):
- Locations: E-Stops are strategically placed around the Outfeed section and on machinery like conveyor belts, cranes, and the saw.
- Usage: Press the E-Stop firmly to immediately stop all machine operations in case of an emergency. Once the issue has been resolved, the E-Stop can be reset to resume operations.
- Safety Benefit: Provides immediate shutdown capability to prevent injury or damage in the event of a malfunction, entanglement, or other hazards.
Isolation Points
- Purpose: Isolation points are used to completely disconnect machinery from power during maintenance or in emergency situations.
- Full Current Isolation: Located near the main control centers (MCC), including the Vacuum Destacker and Paddle Stations, these isolation points should be used during all major repairs or adjustments.
- Compressed Air Valve Isolation: These are located near air-driven machinery, such as the Vacuum Destacker and Docking Saw. They shut off the air supply but do not remove air already in the system.
- Control Gate Isolation: Found in various zones, these isolation points are used for quick corrections without needing to climb into the machinery.
- Light Curtain Areas: Located at the Pack Roll Case and Docking Saw control panels, light curtains function like E-Stops, stopping the machine if an obstruction is detected. These must be reset after activation.
Procedure for Machine Isolation
- Tag and Lockout: Before performing any maintenance or repairs, isolate the machine by switching off power at the isolation point. Apply your personal lockout tag to ensure the machine cannot be restarted while you are working.
- Verify Isolation: Test the machine to ensure it cannot be operated. Attempt to start the machine using the control panel to confirm it is fully isolated.
- Complete Maintenance: Once isolation is confirmed, maintenance or repairs can be performed safely.
- Remove Lockout/Tagout: After work is completed, remove your personal tag and lockout. Verify the area is clear of personnel before reactivating the machine.
Lockout/Tagout/Try Out (LOTOTO) and Isolation Procedures
The Lockout/Tagout (LOTO) system is used to prevent accidental machine start-up during maintenance, repairs, or in an emergency. This system is critical to ensuring that you can safely work on or around the machine without risk of injury from moving parts.
-
When to Use LOTO:
- Before performing any maintenance or adjustments on the Finger Jointer or associated equipment.
- During size changes that require manual adjustments to the cutter heads, glue applicator, or threading chains.
- If there is a malfunction or emergency that requires the machine to be stopped immediately.
-
Steps for Lockout/Tagout:
- Step 1: Power down the machine by using the appropriate shutdown procedure via the HMI (Human-Machine Interface) or manual controls.
- Step 2: Apply your personal isolation tag and padlock to the machine’s power source. This ensures that only you can re-enable the machine after maintenance.
- Step 3: Test the machine to ensure it is fully powered down and will not restart.
- Step 4: Perform the required maintenance or adjustments.
- Step 5: Once the task is complete, remove your lock and tag, notify any colleagues in the area, and restart the machine following the standard start-up procedure.
-
Emergency Isolation:
- In the event of an emergency, use the E-stops located around the workstation to immediately stop the machine. Follow the lockout procedure before accessing the machine to resolve the issue.
Pre-Operational and Post-Operational Safety Checks
Performing safety checks at the beginning and end of each shift is essential to ensure that the Outfeed area is safe for operation and that equipment is in good working order.
1. Pre-Operational Safety Checks
- Guarding and Safety Barriers: Inspect all safety guards and barriers to ensure they are in place and functioning correctly. Guards protect operators from moving parts, such as conveyor belts and saw blades.
- E-Stops and Isolation Points: Test all emergency stops and isolation points to confirm they are operational.
- Visual Inspection: Check for any visible signs of damage, leaks, or malfunctions in equipment. Ensure that air and hydraulic systems are functioning correctly and that no loose parts or debris could cause accidents.
2. Post-Operational Safety Checks
- Cleaning and Shutdown: Remove any debris, dust, and waste materials from the work area and machinery to prevent buildup that could cause malfunctions or fire hazards.
- Machine Shutdown: Ensure all machines are properly shut down and isolated before leaving the area. Record the status of any equipment requiring repairs or maintenance.
- Tool and PPE Storage: Verify that all PPE is in good condition and stored in the correct location. Ensure cleaning tools and equipment are organized and ready for the next shift.
Handling Hazardous Substances
In addition to operating machinery, you may encounter hazardous substances such as adhesives, oils, and lubricants. Proper handling of these materials is essential for preventing health risks.
-
Working with PUR Glue:
- PUR glue is a powerful adhesive used in the Finger Jointer process. It can cause skin irritation, respiratory problems, and eye injuries if not handled properly.
- Always wear gloves and a respirator when working with PUR glue.
- Ensure proper ventilation in the workspace when glue is being applied.
-
Cleaning Up Glue Spills:
- If glue is spilled, clean it up immediately using designated cleaning materials. Never use your bare hands to handle the glue.
- Dispose of waste glue and contaminated cleaning materials in the appropriate bins.
-
Storage and Labeling:
- All hazardous materials, including glue, oils, and cleaning agents, must be stored in properly labeled containers.
- Ensure that storage areas are well-ventilated and secure to prevent spills or leaks.
Safe Use of Specific Outfeed Equipment
1. Cranes and Lifting Equipment
- Overhead Cranes: Always inspect crane remotes for functionality and check the charge on the batteries before use. Ensure that load limits are respected and that beams are lifted and moved safely.
- Safe Lifting Procedures: When using cranes, ensure that no personnel are standing underneath or near the load. Only trained and authorized personnel should operate cranes, and safety barriers should be used when beams are being moved.
2. Saw and Cutting Equipment
- Saw Operation: Always wear appropriate PPE, especially safety glasses and gloves, when using saws. Ensure that the area is clear of debris before beginning a cut.
- Safe Cutting Procedures: Use saw horses to stabilize beams during cutting. Keep hands and loose clothing away from the blade at all times. Use push sticks or tools to maneuver smaller pieces.
- Machine Guarding: Ensure that all safety guards are in place and secure before operating the saw.
3. Conveyor Belts
- Safe Conveyor Operation: Conveyor belts are used to move beams from the finishing planer to the Outfeed section. Never attempt to clear a jam or adjust the conveyor while it is in motion.
- Isolation During Jams: If a beam becomes stuck, isolate the conveyor at the nearest control panel before attempting to clear the blockage. Follow the proper lockout/tagout procedures if additional repairs are necessary.
Summary
This safety module has outlined the essential safety protocols for operating the Finger Jointer Workstation. By following these guidelines, wearing the appropriate PPE, and adhering to lockout/tagout procedures, you can ensure a safe working environment. Remember that safety is a continuous responsibility—stay vigilant and prioritize safety at all times.
The next lessons will cover specific operational tasks, such as starting the machine, conducting pre- and post-operational checks, and handling size changes. Stay alert and always follow safety protocols while working with the Finger Jointer.
