HIGH SPEED PLANER TRAINING
Operating the Planer
Introduction
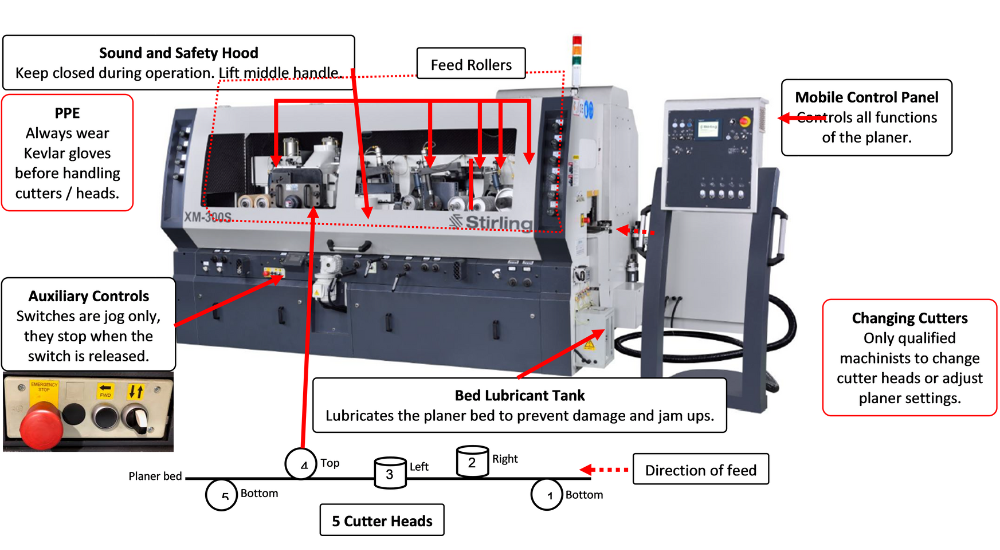
The planer is maintained and set up by trade qualified machinists or apprentices. Operate with the sound enclosure hood closed and guards in place. Refer to the operator manual for details of safe operation, design, maintenance and repair. Ensure all components are kept clean and in good working order at all times.

Planer Control Panel

Planer Setup
Set laminate size according to the program sheets specific thickness. Ensure exact accuracy using the calibrated Vernier calipers as a minor error can multiply across multiple laminates in a beam. Ensure a good quality surface finish to provide a quality gluing surface.

Monitoring the Process
Monitoring Feed Consistency:
Step 1: Monitor the feed rollers as they guide the laminates into the planer. Ensure that the rollers maintain a firm grip on the laminates without causing slippage or misalignment.
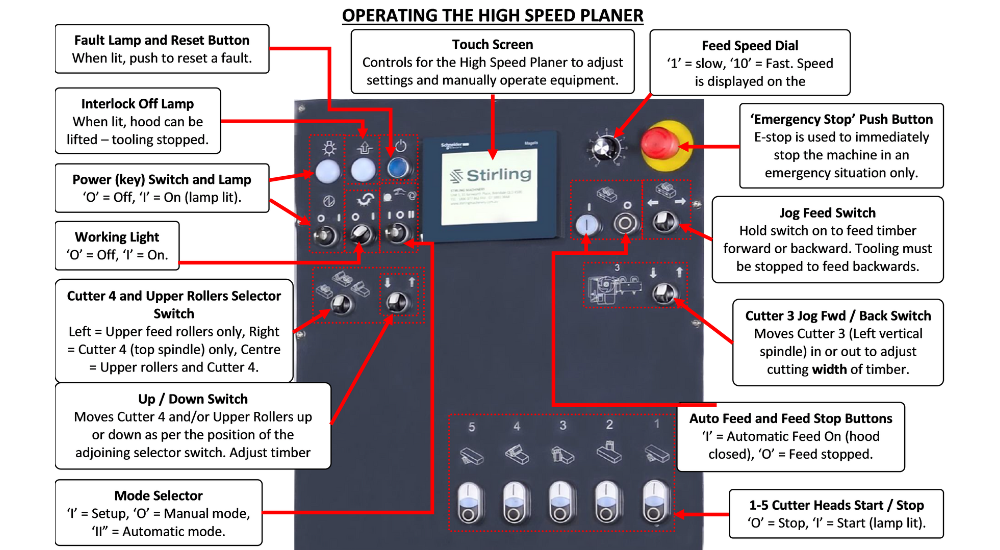
Step 2: Adjust the feed speed using the Feed Speed Dial on the control panel if necessary. The speed should be set based on the type of laminate and the desired surface finish.
4.2.2 Monitoring the Process
Process Monitoring:
Step 1: Continuously monitor the planer’s operation by observing the laminates as they pass through the machine. Look for signs of improper cutting, such as rough surfaces, uneven thickness, or any visible defects.
Step 2: Listen for unusual noises that may indicate issues with the knives, rollers, or other components. Any unusual sounds should be investigated immediately to prevent potential damage to the machine or the laminates.
Adjusting Planer Settings:
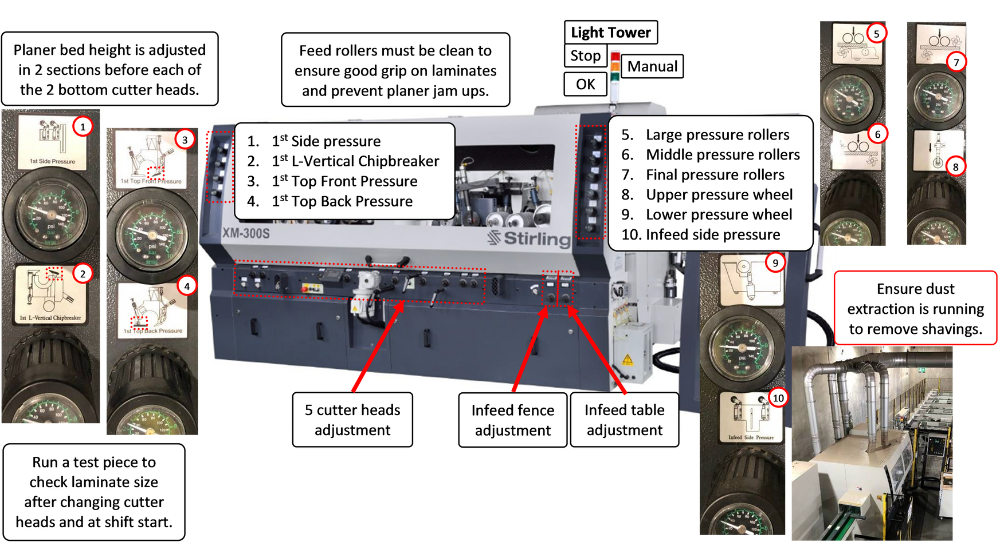
Step 1: If you notice any inconsistencies in the laminate finish, pause the operation and make necessary adjustments to the cutter heads, feed rollers, or other settings. This may include adjusting the pressure of the rollers or re-aligning the cutters.
Step 2: Use the touchscreen control panel to make fine adjustments to the planer settings. Ensure that these adjustments are based on observed issues and are aimed at improving the laminate quality.
HSP Quality Checks and Escalation Process
Quality checks are essential to ensure that laminates produced by the High-Speed Planer (HSP) meet the required specifications. Operators and wood machinists are responsible for conducting these checks at regular intervals, particularly during size changes or every 4th press load. Any issues outside the set tolerances must be escalated and resolved to maintain production quality.
1. Lamella Thickness Check
- How to Perform: Use calibrated Vernier calipers to measure four points along both sides of the lamella.
- Frequency: Every size change or every 4th press load.
- Target and Tolerance: Target is -0mm to +0.2mm.
- Action if Out of Range:
- Make thickness adjustments via the console if needed.
- Escalation: If console adjustments cannot resolve the issue, immediately stop production and inform the wood machinist and supervisor.
- Further notify the Supervisor and EWP Quality Coordinator if undersized material is frequently observed.
2. Lamella Width Check
- How to Perform: Use calibrated Vernier calipers to measure four points along the width of the lamella.
- Frequency: Every size change or every 4th press load.
- Action if Out of Range:
- Inform the wood machinist of any width issues before using the console to make minor adjustments.
- Escalation: If the console cannot solve the issue, cease production and notify the supervisor and wood machinists. Further action is required if undersized material continues to appear.
3. Lamella Squareness Check
- How to Perform: Use a square to measure four points along the lamella’s width, checking for gaps between the square and the lamella.
- Frequency: Every size change or every 4th press load.
- Target and Tolerance: Maximum tolerance is 0.1mm per 100mm of width.
- Action if Out of Range:
- Adjust the planer head installation to ensure even planing and check for knife wear.
- Escalation: If adjusting the head and replacing the knives doesn’t solve the issue, stop production and notify maintenance to inspect the planer and check bed levels.
4. Correct Cut Amount (Top and Bottom)
- How to Perform: Mark the center of a test board, then measure the distance from the center to the top and bottom. After planing, remeasure and calculate the differences to ensure consistency.
- Frequency: Every size change or every 4th press load.
- Target and Tolerance: ±0.5mm.
- Action if Out of Range:
- Adjustments should be made via the bottom head infeed plate.
- Escalation: If adjustments don’t resolve the issue, cease production and notify the supervisor. A head change or full realignment of the planer may be required.
5. Riptec Finish Check
- How to Perform: Visually inspect the length of the planed lamella to ensure the riptec finish is straight and even.
- Frequency: Every size change or every 4th press load.
- Action if Out of Range:
- Check for waves or thick/thin points in the riptec finish.
- Escalation: If issues are present, stop production and notify the wood machinist and supervisor. Cutter adjustment or replacement may be necessary.
Escalation Process
If any of the above checks reveal issues that cannot be resolved through standard console adjustments or minor corrective actions, escalate the issue by:
- Stopping production immediately.
- Notifying the wood machinist and supervisor of the problem.
- If the issue is recurring (e.g., frequent undersized material), report it to the EWP Quality Coordinator for further investigation and adjustments at the infeed grading station.
These quality checks help ensure that all products processed through the HSP meet the required specifications, maintaining high standards and avoiding defects in the final laminated beams. Operators are responsible for performing these checks diligently and escalating any issues promptly to avoid production downtime or compromised quality.
Addressing Common Issues
4.2.3 Addressing Common Issues
Dealing with Planer Jams:
Step 1: If a jam occurs, immediately stop the planer using the Emergency Stop (E-STOP) button. Never attempt to clear a jam while the machine is running.
Step 2: Carefully clear the jam by removing any obstructing laminates or debris. Check the feed rollers and infeed area for any issues that may have caused the jam, such as misalignment or foreign objects.
Managing Poor Surface Finish:
Step 1: If laminates emerge with a poor surface finish, inspect the knives and cutter heads for sharpness and alignment. Dull or misaligned knives can cause rough surfaces.
Step 2: Adjust the planer settings to increase the quality of the cut, which may involve lowering the feed speed or adjusting the pressure of the feed rollers.
Handling Inconsistent Laminate Size:
Step 1: If the laminate thickness or width is inconsistent, pause the operation and re-calibrate the planer. Run additional test pieces to ensure that the adjustments have corrected the issue.
Step 2: Document any persistent issues and report them to your supervisor or maintenance team for further investigation.
